This is Ben from Chat Mapper and I am the lead developer from Chat Mapper.
In this video we will show you some of the things you can do to enhance your conversations using the built-in scripting system.
In the first tutorial we showed you how to do some of the simple conditions but now we will go a bit more in depth.
We use LUA as the language, so if you already know LUA you have a head start but if not, it is pretty easy to learn.
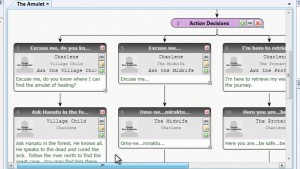
I will start with the tutorial we did in the first video. The project is called the “Amulet” and the player Charlene is in the village trying to find out where the amulet is. The two main goals of this conversation are, first to find out where to go next and it is “the great cave” and second to receive your weapons for your journey.
What we will do is add a few things to do this using the scripting system to make it a little bit realistic of the game you might be making. When you normally go into the conversation, for example this is the first introduction node “the chief said that the amulet will be in this village” but if you don’t want to say that every time you choose this conversation. To change that we will select the node and change the “false” action, under the conditions to pass through and we will condition to display this node only once. As a result when you go through there, since it’s been displayed once already, with this condition it will be blocked and everything after it, but we also added “pass through” it will just pretend that the node is not even there.
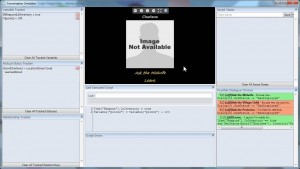
Test that to see how it works now. Going into the conversation, going through that dialogue node once and choosing one of the options offered by the game, go through that conversation and you will have the option to leave. If you click back in the conversation it will go to the menu and not the introduction node again.
The next we are going to do is, instead of just ignoring this introduction, we will give an alternate one. So we will change the node to be set back to block and we will add a “sibling node”. You right click and choose New Sibling Dialogue. Type your text, for example “I should come back once I have the amulet”, just a reminder that we should not be here right away after talking to the protector and child.
The problem here though is that the first time through, both of these nodes are valid and therefore will be presented as a menu, which we don’t want. So we will use a concept of Conditions/ Priorities. We will set the priority on “I should come back” to below normal and that means that If both of the nodes are true, it will just choose the highest priority to display first.
Then the next time to the conditions for this will be false. So the high priority will be the only option and the only displayed one. Test to see how that works.
Going through your dialogue, you will see that when you click back in you will get the new node you added as the only option.
Now we will get a bit more fancy by adding some items, locations and advanced conditions.
First we have to remember that this leave option is available after we have chosen the node 3 and node 9 (in our example dialogue).
Just a note about the SimStatus. Each asset gets a hidden field called Status that can be used for whatever we want, just as a general purpose tag. SimStatus is a special one that applies to dialogue nodes, and it gets stet automatically when the simulation is running, so whenever you use select something and is displayed, then the SimStaus gets set to what is displayed.
So where we say we want the leave option to be available if dialogue 3 and 9 have been displayed. But a little more robust way of doing that, would be to actually set variables. In the nodes where you have to retrieve your weapons and then reach your Great Cave location. So we will do that explicitly. First we will change the New Item to be called Weapons and we will add a new item and call it Amulet (we will use that later). Locations, we will change to Great Cave.
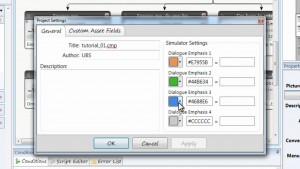
Notice the default fields for the items: Name, Description. It would be ideal if we had a field that was a checkbox, called something like an inventory and we can check if we have it in our inventory. You do that pretty easily by going to Project -> Settings -> Custom Asset Fields tab. This is where you can see all the types of assets, such as Items, locations. You will notice the fields are defined in the table. You have three required fields that you can not delete or change but you also have these custom fields and we will add a new one and call it Inventory, select the Type to Boolean which is a true false value and default value will be false and the Show box, if checked will show this field in the assest browser, just like Age and Gender, but we will leave it unchecked for now. Now we can manipulate this through the scripting language and this is how we do it.
Once you “I am here to retrieve my weapons” and he says “here you are” go to the script editor and we will drag in the Weapons asset and we will write .InInventory = true, so it will look like this Item [ “Weapons”] . InInventory = True. You can apply the same method to any of the assets, drag them into the Scripts editor. The dot. Notation is used to indicate a field or access of field, that means that of that particular item I am accessing the In Inventory field we we just created and setting it true. So now we can use this in inventory, later on wit conditions to determine whether or not I have the weapons. Notice that now we have a little pink dot on the node and that shows we have a script attached to the node. Blue dots indicate conditions that are attached to that node. So by looking at the tree we can easily which nodes have conditions and which have nodes. Once we get the weapons, we can set a point or score increase. Notice in Variables this variable comes with new project called Points. So in Script Editor we will drag the new variable Points and if we are familiar with other programming languages you might expect to be able to do something like plus equals 100 but in LUA you cannot do that so we have to do equals (“=”) and then add the variable Points again (drag variable onto the script box again). So it will look like this: Variable [“points”]: = Variable [ “points”] + 100 . Another thing we will do is on node 4, where we learn about the Great Cave, we will use Mutual Status. Under Script Editor we will add Set Mutual Status and what this does is like the Status field on all of the assets, can be set to whatever we want but the Mutual Status sets a status between two different assets. For example asset 1 will be Charlene and asset 2 will be The Great Cave and the status tag will be Learned About” and we can access the mutual status later, for conditions.
It will look like this: SetStatus |Actor|”Charlene”), Location|Great_Cave”], ‘LearnedAbout”)
We will see how to do that on Node 11 where the conditions were Node 3 and 9 have been displayed.
We will make that a little more intuitive and add the Weapons asset. InInventory == true. We use the double equals for conditions and single equals for script to actually set it to a value. This is where do the mutual status condition. Actor Charlene and Location The Great Cave = Learned about.
It will look like this:
1. Item [“Weapons”] . InInventory == true
2. And GetStatus [Actor |”Charlene”], Location |”Great_Cave”] | ==”LearnedAbout”
This will allow the player to leave the area if the weapons in the inventory and Charlene has learned about the Great Cave. Save the work and simulate.
 Chat Mapper Tutorial (Scripting) Part 2 of 2
 Chat Mapper Tutorial (Basics) Part 1 of 2
 Chat Mapper Tutorial (Basics) Part 2 of 2